A waterfall is certainly one of the most attractive and useful fixtures that can be installed in a reptile vivarium.
A waterfall is certainly one of the most attractive and useful fixtures that can be installed in a vivarium. Companies are now making prefabricated waterfalls, but they can't match the beauty and authenticity of real rock or the colors of other decorative rock used in your vivarium. With a little time, effort and a bit of artistic vision, you can create a real-rock waterfall that will match other rock used in your vivarium.
Rock in a Vivarium
Rock that is safe for use in aquaria and moist vivaria can be used to construct a natural-rock waterfall. Good rock includes most hard sandstones; most metamorphic rocks, such as marble; and most hard, dense igneous rocks, such as granite.
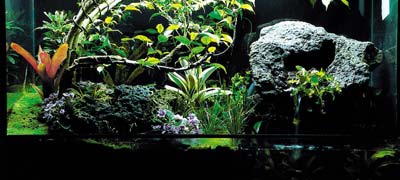
Photo by Rex Lee Searcey
Pictured is the waterfall described in this column, installed in the pond section (right side) of a tropical forest vivarium.
When choosing waterfall rock, avoid rocks with potential toxic qualities, such as those with a rusty, orange or red appearance indicative of iron; copper-reds or greens suggesting copper; yellows indicating sulphur; and any with a heavy salt content. Unless you're up on rocks, refrain from using any rock that is overly light, porous, bubbly, chalky, crumbles easily, has unnatural colors or a metallic sheen. Some limestones can break down in moist settings and cause elevated pH levels.
I use Mexican bowl lava in tropical forest vivaria. I'm sure it is possible to find similar volcanic rock in rock yards (lawn-and-garden outlets) around the country. Bowl lava is dense volcanic rock that was full of gas pockets and bubbles as it solidified, leaving behind numerous open areas within the rock. It is very attractive, rugged-looking and full of holes, nooks and crannies. Some pieces have caves, natural canyonlike channels and large bowl-like depressions, hence the name. Bowl lava is useful for creating little ponds or water holes, streams and waterfalls, as well as caves and hills in the vivarium landscape.
The waterfall described in this column is a relatively simple one, for a small vivarium pond, made from two pieces of rock. You might find one large, perfectly shaped piece that can be used by itself as a waterfall. Usually, though, it is necessary to put two or more pieces together to create a waterfall of the appropriate size and shape.
The top piece has a "cave" with a hole at the back. This makes it perfect for attaching a tube from a recirculating pump. The water is pumped into the cave. The cave fills with water, which then spills out and falls into the vivarium pond. The cave rock is attached to a hill-shaped base rock, elevating it a few inches above the surface level of the 6-inch-deep vivarium pond. If you can't find a piece with a convenient hole of appropriate size, you can chip a small hole to make it larger or drill one with a masonry drill bit. This rock is easily cracked or broken, so be careful.
Vivarium Material Checklist
The equipment and materials you will need include: disposable latex gloves; a disposable one-half to 1-gallon mixing container; an old spoon for mixing; some quick-setting, high-strength, nonshrinking grout/cement (typically used for concrete and masonry repair); some concrete coloring (either powdered or liquid – use brown for this volcanic rock and black and tan to match secondary colors in the rock); a couple tubes of InstaCrete or similar epoxy putty (AquaMend is another one); a couple levels (small and very small); tools for forming and texturing the grout to match the rock surface, including small steel and/or stiff nylon brushes, an old fork, old screwdriver, chopstick, old pencil, etc.; paint brushes of various sizes; large tweezers; half-inch PVC thread/slip pipe fitting; and a pipe clamp for half-inch pipe.
Most small aquarium recirculating pumps use half-inch tubing. If your pump uses a different size tubing, adjust the size of the fitting and clamp accordingly. Depending on the snugness of the tubing fit to the PVC fitting and/or pump, you may not need the pipe clamp at all, or you may need one or two.
You should have a large, level table on which to construct your waterfall. A lazy Susan or other rotating surface is also useful, because it eliminates the need for lifting and moving a heavy waterfall – any side can be worked on with a quick, easy spin.
Making the Waterfall For Your Vivarium
Carefully measure the inside dimensions of your vivarium pond area. Begin experimenting with various combinations of rocks until you find a design that appeals to you and will fit into the allocated space. You can position it relatively close to a back or side tank wall, but leave plenty of room at the front for a decent open water area for plants and aquatic animals, and so that splashing water does not get all over the front tank glass. Also leave at least 2 inches of space between the waterfall and the edge of the pond so that splashing water does not waterlog the terrestrial area.
Be sure that your finished waterfall is tall enough so that the bottom edge of the rock lip, from which the water falls, is a few inches above the pond surface, but not so tall that it crowds the tank top or interferes with your vivarium tree branches or other plantings. You can create a simple waterfall in which water just flows or bubbles from a hole in the rock and drops into the pond. Or you can create a more elaborate waterfall, such as one that has a top basin that fills with water and overflows into the pond, or one with a streamlike channel so that the water flows a short distance before dropping into the pond. Use as many pieced-together rocks as necessary to achieve the desired effect, and so it looks like one solid rock formation.
As you create your design, be sure to leave an appropriately sized space under or behind your waterfall for the recirculating pump you have chosen. Also, be sure you have positioned the hole for your PVC fitting (where your pump tubing will enter your waterfall) someplace at the back or underneath. This way it can remain unseen or be hidden later by plants or other rocks, and it can be easily attached with the tubing to the pump.
After you have picked your rocks and created the design you want, use the InstaCrete putty to initially attach your chosen pieces of rock together. Be sure to position your rocks carefully and use levels of appropriate sizes to ensure that any water-pooling areas are level, so water will not run out anywhere you don't want it to. Make sure that the drip edge is also level, so water flows evenly and attractively into the pond.
To use the putty, break off a piece as large as you need to use in one spot to attach two pieces of rock. Work the putty in your hands to thoroughly mix the inner putty with the outer layer of catalyst. This putty hardens rapidly when mixed, so work fast. As soon as it is mixed, press it onto the surface of one rock, then press the other rock onto the first. Work the putty firmly around on all sides, in all spaces, cracks and nooks where the rocks meet, to make sure they are thoroughly attached. In about 15 or 20 minutes the putty should be hard and the rocks securely bonded together. However, wait another hour or so to allow for full setting. Once the putty is fully set, you can attach another piece of rock or move on to the grouting.
After you have connected all of your rock pieces with the putty, position your PVC pipe fitting with the threaded end on the inside of the waterfall, where water will exit, with the slip end extending out and down in the appropriate direction to connect to the tubing from your pump. Secure the fitting in the hole with putty, and make sure it is sealed all around and that the fitting opening is not blocked with putty.
Grouting a Vivarium
After the rocks and PVC fitting are all attached and the putty has thoroughly hardened, use the quick-setting grout to cover and fill in around the attached areas, to hide the putty, create a thicker and stronger attachment, and make the entire collection of rocks look like one natural rock formation. Use the latex gloves to protect your hands from the grout. You may also want to wear a dust mask to help prevent inhalation of any grout. Use the disposable container and old spoon to mix the grout. You will probably need to mix several small batches, mixing only as much grout at a time as you can use. Once mixed with water, it will begin to harden within 15 minutes.
Use a little of the brown cement color in the grout to make it about the same color as the main base color of the rock. You may want to mix a very small trial amount of the grout, so that you can learn how much to use to make your grout the correct color.
To mix the grout, put some of the dry grout into the container, then add some of the color and mix thoroughly. Next, you'll want to add water, a little bit at a time, which you'll mix continually, until you get a claylike consistency that you can plaster onto the rock with your fingers. Take gobs of the grout and put it on the areas where the rocks are connected, thoroughly pushing it into the spaces, crevices and all areas you want to hide or fill up, gradually smoothing it out to create natural-looking surfaces. (Do not wash the grout wastewater down your household drain, as it can coat and clog your pipes.)
Texturing and Coloring a Vivarium
The grout will quickly harden, so, while it is still pliable, use your various texturing tools to create holes, nooks, crannies and a rough texture that looks like the rest of the rock. Repeat this process with more batches of grout until all of the connecting areas have been filled in and textured.
Don't forget the area around your PVC fitting. If it is in an area where it can be seen, you want the water hole to look like a natural opening. At this time, you can also use the grout to fill in any small holes that might allow water to leak where you don't want it to, and to patch and strengthen any cracks (weak areas) in the rocks.
After you have finished your last area of grout, allow the waterfall to sit for an hour or so to make sure all areas are completely dry and set. Then take your waterfall outside and thoroughly wash it with a hose to remove any grout dust and loose particles. Allow it to dry a little and bring it back inside. Now you want to mix small batches of grout slip (runny grout), about the consistency of thick poster paint, adding your cement colors to make various colors that match some of the secondary colors of the rock (black, dark brown, light tan, etc.).
Using your selection of brushes, daub and stipple the different colors over the grouted areas to create speckles, spots and patches of colors that look like those occurring over the rest of the rock. To make them blend, you can extend the stippling lightly over the rest of the rock. You want to end up with a rock formation that looks natural, with the connecting areas of grout as indistinguishable from the rest of the rock as possible. Allow the waterfall to dry again for about an hour and then give it a final washing.
Testing and Installation of a Vivarium
To test your waterfall and make sure it functions the way you want prior to placing it in your vivarium, set it outside on a level surface and place the end of your garden hose over the protruding end of your PVC fitting, creating a seal with your hand as best you can. Turn on the water at a very low flow rate, about what you expect your recirculating pump will produce. The water should flow out and spill off the waterfall as expected. If it doesn't, you can adjust the level of the waterfall by attaching a small piece of rock(s) underneath in any area(s) necessary to tilt the waterfall one way or another. You can also use more grout to raise an edge of the spill lip or plug an area as necessary to even out the water flow.
To install the waterfall in the vivarium pond, place your sand on the bottom of the pond and set the waterfall in place, settling it into the sand until it is stable and positioned where you want, facing the way you want and level. Place your pump under or behind the waterfall according to your plan, and attach it to the PVC fitting using your pump tubing.
If the tubing connection to either the pump or PVC fitting is not very snug, you will need to use a pipe clamp to secure it. Fill the pond with water to the appropriate level. Be sure to use treated or aged tap water or clean pond or aquarium water. Do not use distilled or reverse osmosis purified water, unless you have added the appropriate minerals to bring it up to adequate hardness. Have a container of extra water on hand, as you'll need to add a little more once the pump is running to keep the water level where it should be. Feed the pump cord out of the vivarium, and plug it in and turn it on. If your pump is adjustable, adjust the flow to the desired intensity.
Allow the waterfall to run for a day or two before adding plants and animals to the pond. Remember that your vivarium pond will function like any small aquarium, so follow the appropriate procedures for the addition and acclimation of plants and animals.
Congratulations are in order, because you've just transformed your vivarium from the commonplace to the sublime with the addition of a waterfall.